
Amigurumi marker!
Do you find yourself losing count of your stitches when crocheting in a spiral round? Are you confused about where the row starts or ends? Do you get frustrated with the mistakes you make and end up ripping your work apart a lot?
The reason for this could be that you are not using a stitch marker to mark the end or the start of each round.
I honestly can't imagine crocheting in a spiral round without using a stitch marker despite being an experienced crocheter and a pattern designer. It really surprised me how many people don't use this simple tool to save themselves from stress and frustration.
I understand some people might not be using them as it takes a few seconds to take the stitch marker off and then put it back on. That's why I decided to do this crochet tutorial to show you my quicker and more reliable method of using a stitch marker.
This method is going to save you time! You also won't forget to put the stitch marker back on at each row as you could with the traditional method.
With my method, it only takes 2 seconds to move the stitch marker up from the last stitch of the previous round to the last stitch of the new round.
You will find this tutorial a life-changer!
STITCH MARKER TUTORIAL
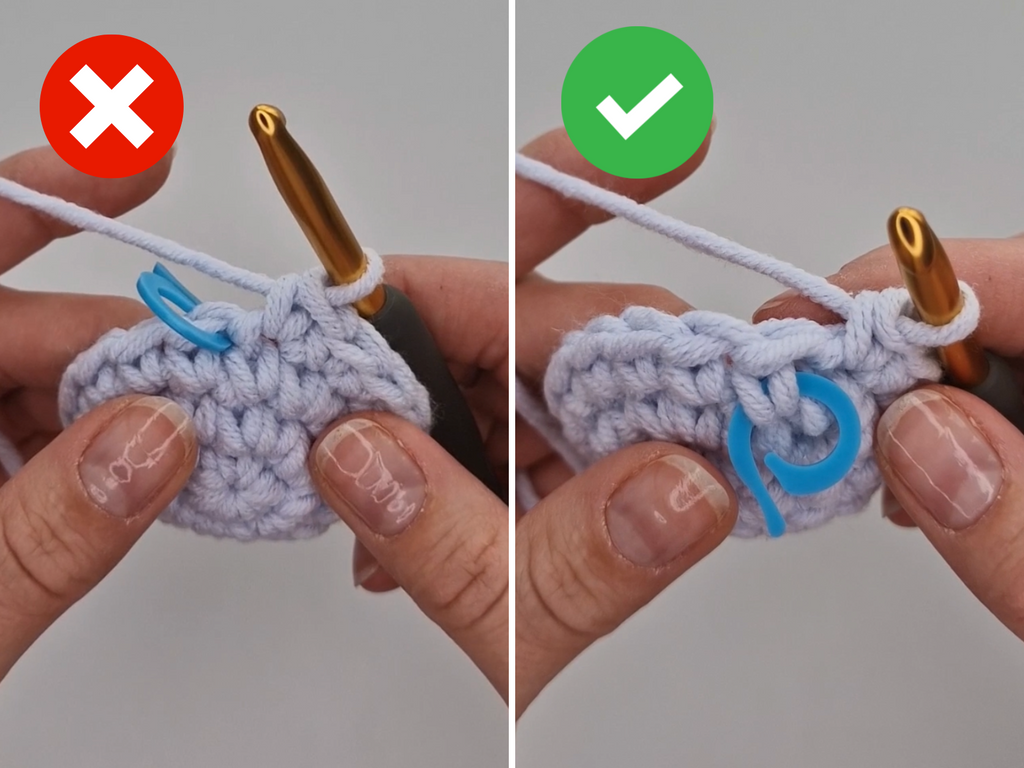
The most common way to use a stitch marker is to place it under two top loops of the first stitch of each round as in the photo on the left below.
The problem with this method is that in order to make the first stitch of the new round you need to take the stitch marker out and put it down. You can then make the stitch and after that you have to remember to pick the marker up and put it back on the first stitch of the new round. If you get distracted you can simply forget to put it back on.

The image on the right shows my simpler and easier technique of using a stitch marker.
The main differences are:
1. Instead of marking the first stitch of each round, I mark the last stitch of each round. When I get to the end of the round I know my last stitch goes in the stitch with the marker in.
2. Instead of inserting the marker under two top loops of the stitch I insert the stitch marker under front 'V' of the stitch (see the photo on the right, above). This way I don't need to take the stitch marker out in order to make the last stitch of the round. I can simply make the stitch in the marked, last stitch of the previous round and then move the stitch marker up right away to the last stitch of the current round I just made without having to put it down. This removes the risk of forgetting to put it back on.
To summarise those are the simple steps to use the stitch marker using my method:
STEP 1. As soon as you make the last stitch of the first round mark it with a stitch marker by inserting it under from 'V' of the stitch.
STEP 2. Once you get to the end of the following round, make the last stitch in the stitch that has the marker in it (without taking it out).
STEP 3. Move the stitch marker up - Take the stitch marker out and put it in the front of the last stitch of the current round you just made as shown in the photos below.


If you find the video tutorials easier to understand, you can find this tutorial on our social media platforms:
Instagram, Tik Tok, Facebook, YouTube and Pinterest
If you found this tutorial helpful, please share it with your friends!